Thursday, August 7, 2014

Productivity tips: live templates in Visual Studio and ReSharper

In my blog post Two readability tips for naming and organizing tests, I shared some tips for arranging tests. The tests are typically named and organized like this:


[Test]
public void ItemUnderTest_Scenario_ExpectedBehaviour()
{
  // Arrange
  Arrange the test here...

  // Act
  Do the action which is being tested here...

  // Assert
  Do assertions here...
}

While the naming and arrangement scheme is simple enough, it quickly becomes boring to write this stub every time you write a new test. If you are fortunate enough to use Visual Studio with the ReSharper plug-in, however, there is a nice feature called "live templates" which can do it for you!

Live templates allow you to type a keyword, select one of the live template entries from the popup menu which automatically pops up, and ReSharper will automatically insert the template for you. In this case, the template for a test is named "test":


After the template is pasted into the test class, there is no need to navigate the cursor around in order to edit the details in the test name. Red rectangles represent the fields that you will typically want to edit (ItemUnderTest, Scenario and ExpectedBehaviour). Enter the contents of those fields, press enter after editing each field, and then you're ready to implement the test!

Create and edit the live templates in ReSharper->Templates Explorer. As you can see, there are already many useful built-in templates:


Notice how you define the fields that the user typically edit after inserting the template: $ItemUnderTest$, $Scenario$ and $ExpectedBehaviour$. After the user has entered the contents of those fields, the cursor is placed at the optional $END$ keyword.


Thursday, June 26, 2014

Help, my class is turning into an untestable monster!

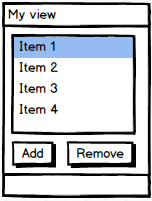
SO, let's say that you have a nicely designed and unit tested class. Perhaps it's a MVVM dialog model which takes care of commands and displaying stuff. In the beginning, this class has a single list of selectable objects, a button which adds a new object and a button which removes objects:


Testing this is simple, isn't it? Create a test which verifies that the list has the relevant objects. Write another test which adds a new object and a third test which removes the selected object. Life is easy!

Now your client is so happy with the dialog, he has some additional requests. He wants to add some complex filtering so that only objects that meet certain criteria are visible. He also wants the list to be shown in a hierarchical tree instead of a flat list. Of course he also wants to define how to group them. Oh, and, based on the user's privileges, the remove functionality may or may not be enabled:


Now we have thrown a lot more logic into the dialog. There are multiple cases which yield a growing number of permutations -- how can we make sure that we cover all of those scenarios in tests? The user may or may not filter, he may or may not group into categories, etc. Your class is starting to get hard to test. It's turning into an untestable monster.

You will see this in your code. You will see it a lot. Well, it's a sign!


It's a sign

Testable code which turns into untestable code usually means that the code has a more fundamental problem. As a class grows, it is getting more and more responsibilities. More responsibilities means more scenarios to cover, and more complexity. The class is starting to violate The Single Responsibility Principle.

Regardless of whether we do TDD or not, this is a bad thing. It's time to divide and conquer -- split your complex multi-responsibility class into smaller, simpler single-responsibility classes. Those classes will be easier to test, and you will avoid all the complex test scenario permutations.

Divide and conquer

In our view model example, the view model has at least these responsibilities:
  • Do filtering of items based on some criteria
  • Organize the items into a hierarchy based on user selection
  • Present the hierarchy as a tree view
  • Allow user to select items
  • Add and remove items
  • Disable features based on user privileges
Obviously, this class is violating the Single Responsibility Principle! Hence, the root of the problem is not the testability as such -- it's the class itself. The increasing complexity of the tests has revealed that the production code is a candidate for refactoring.

In this case, I would split the class up into a filter class, a hierarchy organizer class, user interaction handler, etc. This is a good idea anyway from a software quality perspective.

Conclusion

As classes grow with an increasing number of responsibilites, testing becomes harder. Don't get tempted to skip the tests. Instead, refactor the production code class so that it becomes testable AND well-designed.

TDD is not only a first line of defense against new defects. It's also a very efficient design tool which forces you to keep your classes tidy and adhere to the SOLID principles.

Poor testability is a sign. Embrace the sign. Refactor your code today!

Wednesday, June 11, 2014

Automated testing of rendering code

In my blog post "TDD and 3D visualization", I wrote about a somewhat complex scenario: how to do TDD on 3D visualization. That blog post focused on visualization using high-level toolkits like Open Inventor or VTK. In that case, we don't test the rendered result. Instead, we test that the state of the scene graph is correct, and we trust the 3D toolkit to do the rendering correctly for us.

What if we write the rendering code ourselves? This may be the case if we write our own ray tracer or GPU shaders. In that case, we actually need to verify that the rendered pixels are correct.

Bitmap-based reference tests

TDD-style test-first development is not easy to do in this case, and it may not even be possible. The test result itself is much more complex than a trivial number or string result. How can we write a test that validates a complex image without having the rendered image up front?

In this case, it may be more convenient to write the rendering code first and then use a rendered image as a reference image for the test. We will loose some of the benefits of doing proper TDD, but those tests will still act as regression tests that verify that future enhancements do not introduce defects.

The production code and tests will thus be written like this:

  1. Write production code that renders to a bitmap
  2. Verify the reference image manually
  3. Write a test that compares future rendering results with this reference image
  4. Fail the test if they differ

Allow for slight differences

This may sound fairly trivial, but reference image-based tests have one major challenge: the rendered images may differ slightly because of different graphics cards and different graphics card drivers:


For example, different drivers may apply shading differently so that the colors vary between driver versions. Furthermore, antialiasing may offset the image by one pixel in either direction, and the edges may be rendered differently. We certainly don't want the tests to fail because of this, because then we stop trusting the tests.

Hence, we need to allow for small differences between the rendering result and the reference image. More specifically, we need to allow for
  • Single pixel offset
  • Small differences in color or intensity
I have been using this approach with good success:
  1. Render image
  2. For each pixel in the rendered image, find the pixel in the 3x3 neighbouring pixels in the reference image with the lowest deviation in RGB pixel value. Add this deviation to a list.
  3. Create a histogram of all the pixel deviations so that you can calculate the distribution of the errors.
  4. Decide on an error threshold for acceptable differences. For example, say that
    • A maximum of 0.1% of the pixels can have a larger RGB deviation than 50
    • A maximum of 2% of the pixels can have a larger RGB deviation than 10
    • A maximum of 20% of the pixels can have a larger RGB deviation than 3
You should start with a fairly strict tolerance. If you find that you get too many false positives, increase the tolerance slightly.

By defining a deviation distribution tolerance like this, you will allow for small variations while still catching rendering defects that cause rendering errors.

Render to bitmap, not to screen

If possible, render to an offscreen buffer in the tests. This is more robust than rendering to a window and then doing a screenshot, because the tests will not be obstructed by other windows, screensavers, locked computer, etc. This might be a good idea architectural idea anyway, as it separates rendering from display.


Wednesday, May 28, 2014

Code coverage -- meaningless number or the Holy Grail?

Code coverage is a term which is often brought up when discussing TDD. Code coverage is the percentage of the lines of code that are executed by unit tests.


Many teams have a specific goal for the code coverage. For example, a typical goal is to have at least 80% code coverage. Others claim that code coverage is a meaningless number because you can have 100% code coverage with nonsense tests that have no value. So which coverage should one aim for?

Coverage is not a measure of quality

You can have 100% test coverage, and yet the tests may be worthless. A single test which simply executes every line in the production code without asserting on anything will yield a 100% coverage, but it won't detect any defects. Clearly, coverage can't be used to measure test quality. So what is it good for?

Coverage is an alarm bell

Although a 100% coverage does not provide much information, the opposite case does. If you have a test coverage of 20%, it means that almost none of the production code is tested. Sound the alarm and do something!

Hence, code coverage should be used as an indication that something is wrong and not as a measure of test quality. 

So which coverage should we aim for?

Personally, I rarely measure code coverage. If you do proper TDD (write test first and never touch production code before you have a failing test), your coverage will naturally be close to 100% because you already test for all the desired behavior. Some test runners decorate the source code as you type to indicate whether it's covered by tests, so untested code will be screaming at you.

If a team wants to run periodical code coverage analysis in order to enable the lack-of-tests alarm bell, I would aim for close to 100% on testable code and 0% on untestable code. Testable and untestable code should ideally be separated into different modules of the application, but that's another story which deserves a separate blog post at some point in the future...

Monday, May 19, 2014

Test-driven development of plug-ins

How can we do test-driven development in a plug-in environment where our production code lives inside of an application? This may be the case if we are developing plug-ins for applications like Microsoft Office, Adobe Photoshop or Schlumberger Petrel. There are two challenges with this:
  1. NUnit (or any other test runner of choice) may not be able to start the host application in order to execute the plug-ins
  2. Starting the host application may take a while. If it takes 30 seconds to start the application, it's hard to get into the efficient TDD cycle that I describe in the blog post "An efficient TDD workflow".

Abstraction and isolation

Abstraction, inversion of control and isolation are common strategies when we develop code which is dependent on the environment. The idea is to make abstractions to the environment and thereby omitting it when executing the tests. It's not always possible, though. Sometimes our plug-in interacts heavily with and is dependent upon the behavior of the environment.

So what do we do then? If we can't isolate them, join them!

Unit test runner as a plug-in

Both challenges above can be solved by creating your own test runner as a plug-in inside of the host application! Instead of letting NUnit start the host application (slow and perhaps not even possible), the host application is running the tests.

So instead of doing a slow TDD cycle like this:


We want to move the host application startup out of the cycle like this:


So how can we do this? Create a test runner inside the host application... as a plug-in!

Let's have a look on one specific case: a test runner as a plug-in in Petrel. Petrel faces challenge #2 mentioned above. It can run in a "unit testing mode" where NUnit tests can start Petrel and run the Petrel-dependent production code, but startup takes 30-60 seconds.

If you are using NUnit, this is quite simple. NUnit provides multiple layers of test runners, depending on how much you want to customize its behavior. A very rudimentary implementation which allows the user to select a test assembly, list tests and execute them could look like this:

public partial class TestRunnerControl : UserControl
  {
    private readonly Dictionary<string, List<string>> _assembliesAndTests = new Dictionary<string, List<string>>();

    private string _pluginFolder;

    public TestRunnerControl()
    {
      InitializeComponent();

      this.runButton.Image = PlayerImages.PlayForward;

      FindAndListTestAssemblies();
    }

    private void FindAndListTestAssemblies()
    {
      var pluginPath = Assembly.GetExecutingAssembly().Location;
      _pluginFolder = Path.GetDirectoryName(pluginPath);

      AppDomain tempDomain = AppDomain.CreateDomain("tmpDomain", null, new AppDomainSetup { ApplicationBase = _pluginFolder });
      tempDomain.DoCallBack(LoadAssemblies);
      AppDomain.Unload(tempDomain);

      foreach (var testDll in _assembliesAndTests.Keys)
      {
        this.testAssemblyComboBox.Items.Add(testDll);
      }
    }

    private void LoadAssemblies()
    {
      foreach (
        var dllPath
          in Directory.GetFiles(_pluginFolder)
            .Where(f => f.EndsWith(".dll", true, CultureInfo.InvariantCulture) && f.Contains("PetrelTest")))
      {
        try
        {
          Assembly assembly = Assembly.LoadFrom(dllPath);

          var dllFilename = Path.GetFileName(dllPath);

          try
          {
            var typesInAssembly = assembly.GetTypes();

            foreach (var type in typesInAssembly)
            {
              var attributes = type.GetCustomAttributes(true);

              if (attributes.Any(a => a is TestFixtureAttribute))
              {
                if (!_assembliesAndTests.ContainsKey(dllFilename))
                {
                  _assembliesAndTests[dllFilename] = new List<string>();
                }

                _assembliesAndTests[dllFilename].Add(type.FullName);
              }
            }

            Ms.MessageLog("*** Found types in " + assembly.FullName);
          }
          catch (Exception e)
          {
            Ms.MessageLog("--- Could not find types in " + assembly.FullName);
          }
        }
        catch (Exception e)
        {
          Ms.MessageLog("--Could not load  " + dllPath);
        }
      }
    }  

    private void TestAssemblySelected(object sender, EventArgs e)
    {
      this.testClassComboBox.Items.Clear();

      var testAssembly = this.testAssemblyComboBox.SelectedItem as string;
      if (!string.IsNullOrEmpty(testAssembly))
      {
        foreach (var testClass in _assembliesAndTests[testAssembly])
        {
          this.testClassComboBox.Items.Add(testClass);
        }
      }
    }

    private void runButton_Click(object sender, EventArgs e)
    {     
      if (!CoreExtensions.Host.Initialized)
      {
        CoreExtensions.Host.InitializeService();
      }

      var results = RunTests();

      ReportResults(results);
    }

    private void ReportResults(TestResult results)
    {
      var resultsToBeUnrolled = new List<TestResult>();
      resultsToBeUnrolled.Add(results);

      var resultList = new List<TestResult>();
      while (resultsToBeUnrolled.Any())
      {
        var unrollableResult = resultsToBeUnrolled.First();
        resultsToBeUnrolled.Remove(unrollableResult);

        if (unrollableResult.Results == null)
        {
          resultList.Add(unrollableResult);
        }
        else
        {
          foreach (TestResult childResult in unrollableResult.Results)
          {
            resultsToBeUnrolled.Add(childResult);
          }
        }
      }

      int successCount = resultList.Count(r => r.IsSuccess);
      int failureCount = resultList.Count(r => r.IsFailure);
      int errorCount = resultList.Count(r => r.IsError);

      string successString = string.Format("{0} tests passed. ", successCount);
      string failureString = string.Format("{0} Tests failed. ", failureCount);
      string errorString = string.Format("{0} Tests had error(s). ", errorCount);

      string summary = successString + failureString + errorString;

      this.resultSummaryTextBox.Text = summary;

      this.resultSummaryTextBox.Select(0, summary.Length);
      this.resultSummaryTextBox.SelectionColor = Color.FromArgb(80, 80, 80);

      if (successCount > 0)
      {
        this.resultSummaryTextBox.Select(0, successString.Length);
        this.resultSummaryTextBox.SelectionColor = Color.DarkGreen;
      }

      if (failureCount > 0)
      {
        this.resultSummaryTextBox.Select(successString.Length, failureString.Length);
        this.resultSummaryTextBox.SelectionColor = Color.Red;
      }

      if (errorCount > 0)
      {
        this.resultSummaryTextBox.Select(successString.Length + failureString.Length, errorString.Length);
        this.resultSummaryTextBox.SelectionColor = Color.Red;
      }

      this.resultSummaryTextBox.Select(0, summary.Length);
      this.resultSummaryTextBox.SelectionAlignment = HorizontalAlignment.Center;

      this.resultSummaryTextBox.Select(0, 0);

      // Set grid results
      this.resultsGridView.Rows.Clear();

      int firstErrorIdx = -1;

      foreach (var result in resultList)
      {
        var testName = result.Name;
        var image = result.IsSuccess ? GeneralActionImages.Ok : StatusImages.Error;

        int idx = this.resultsGridView.Rows.Add(testName, image);

        if (firstErrorIdx == -1 && !result.IsSuccess)
        {
          firstErrorIdx = idx;
        }
      }

      if (firstErrorIdx != -1)
      {
        this.resultsGridView.FirstDisplayedScrollingRowIndex = firstErrorIdx;
      }
    }

    private TestResult RunTests()
    {
      var testAssembly = this.testAssemblyComboBox.SelectedItem as string;
      var testClass = this.testClassComboBox.SelectedItem as string;

      TestPackage testPackage = new TestPackage(Path.Combine(_pluginFolder, testAssembly));
      TestExecutionContext.CurrentContext.TestPackage = testPackage;

      TestSuiteBuilder builder = new TestSuiteBuilder();
      TestSuite suite = builder.Build(testPackage);

      var testFixtures = FindTestFixtures(suite);
      var desiredTest = testFixtures.First(f => f.TestName.FullName == testClass);
      var testFilter = new NameFilter(desiredTest.TestName);
      TestResult result = suite.Run(new NullListener(), testFilter);

      return result;
    }

    private IEnumerable<TestFixture> FindTestFixtures(Test test)
    {
      var testFixtures = new List<TestFixture>();

      foreach (Test child in test.Tests)
      {
        if (child is TestFixture)
        {
          testFixtures.Add(child as TestFixture);
        }
        else
        {
          testFixtures.AddRange(FindTestFixtures(child));
        }
      }

      return testFixtures;
    }
  }

Note that this code sample is not complete, but it shows how to find and run the tests. Use the test runner control in a plug-in inside the host application, and it will look like this:


Whenever a test is failing, Visual Studio will break at the offending NUnit Assert statement:


So how does this allow for an efficient code-test cycle? By using Visual Studio's Edit & Continue! Whenever you want to edit the production code or the test code, press pause in Visual Studio, edit as needed, and run the tests again. Hence, you can write code and (re)run tests at will without restarting the host application.

It's not as efficient as writing proper unit tests that execute in milliseconds, but it's far better than waiting for the host application on every test execution.

Wednesday, May 14, 2014

An efficient TDD workflow

How do you do your everyday TDD work? There are many ways to skin a cat, but I like to do it in a cyclic fashion:


I start by writing a very simple failing test. I then implement enough of the production code to just make this test pass. I then add more details to the test which make the test fail again. I implement more of the production code so that it passes again. Rinse and repeat until your tests are covering all the use cases.

Let's say that I want to write a Matrix class with an inversion method. I'd start with a super simple test case where I assert that the inverse of the identity matrix I is an identity matrix. I'd then add more and more cases:

  1. Create test which asserts that the inverse of the unity matrix I is a unity matrix. Production code returns an empty matrix, so it will fail
  2. Fix the production code so that it always returns I. The test will pass.
  3. Add new test case which asserts that the inverse of a different 2x2 matrix is correct. The test will fail
  4. Fix the production code so that it calculates the inverse of any 2x2 matrix. The test will pass
  5. Add new test case with a 3x3 matrix. The test will fail
  6. Fix the production code so that it calculates the inverse of any size matrix. The test will pass.
  7. Add new test case which asserts that calculating the inverse of a singular matrix throws an ArithmetricException. The test will fail because it tries to divide by zero
  8. Fix the production code so that it handles singular matrices correctly. The test will pass.
...and the show goes on until I am satisfied. Note that I'm not writing the entire test and then the entire production code method. Both the test and the production code evolve in parallel -- but I always have a failing test before doing anything with the production code.

Furthermore, I like to have the production code and the test code side-by-side like this so that I don't need to switch back and forth between the files:


If you are using a good test runner like NCrunch, you don't even need to run the tests manually. They are run automatically as you type, and you will have instant feedback when the test fails or passes!


Thursday, April 24, 2014

Sounds great, but what is the cost?

My latest posts have been very developer-centric. This post should address a broader audience, including those with suits and ties. Yes, managers and CEOs, I am talking to you! ;-)

Test-driven development is not only about writing code, however. Software development is about delivering value to a customer and earning money. Profit is income minus costs. One of the most common arguments against TDD is "it takes too long time" or "it is too expensive". So what is the cost of doing test-driven development?

It's not easy to put a price tag on test-driven development. We can get an idea about the alternative (not doing TDD) by looking on the Total Cost to Market, however. This is the total cost of a change in an application from idea to customer deployment. The total cost includes

  • Developing the feature
  • Testing
  • Bug fixing
  • Cost of risk that there are defects
  • Customer deployment
The cost incurred by actually typing the code is just a fraction of the Total Cost to Market.

Total cost to market

How much does it cost to develop a given feature?


In the beginning of a development phase, this is a fairly simple calculation: it's the number of hours spent on coding multiplied by the developers' hourly rate.

As time progresses and the product grows, this price increases because we add the risk of introducing bugs that are not discovered. A bug which is introduced late in the development cycle is more costly because there is an added risk that this bug (or a new bug that is introduced by the bug fix) is never discovered.

It becomes even worse after feature freeze when beta testing has started. If a bug is discovered after 90% of the testing has finished, how do we know that the bug fix did not introduce a new bug affecting the previously tested features? Do we test everything over again? Now that's an additional cost that contributes to the exponential cost graph!

And now the nightmare begins: what if the bug is discovered by the customer instead of our testers? That adds the additional cost of lost customer satisfaction and re-deployment. We can't easily put a number on this which can be put into a budget, but we certainly want to avoid that!

Fail early

The moral is; we want to fail early. We want to discover bugs as early as possible in the development cycle. The developer should get an alarm bell as soon as he creates the defect and not when a beta tester (or even worse, the customer) discovers it.

Bugs will occur, so we want to find and fix them while the cost is low. In other words, we want the bug to contribute as little as possible to the Total Cost to Market.

Good unit tests is a good first line of defense against bugs. Surely it's not a guarantee that you will deliver bug-free software, but it's a very efficient tool to deliver software with fewer bugs. Little research is done to actually quantify the economical benefit of TDD, but this study done on a few projects in IBM and Microsoft indicates that TDD roughly gave 25% increased developer time and reduced the number of bugs to a third: http://research.microsoft.com/en-us/groups/ese/fp17288-bhat.pdf

Conclusion

Did I answer my own question about the cost of doing TDD? No, I can't provide you with the number of dollars to put into your budget spreadsheet. However, it's pretty obvious that we can reduce the Total Cost to Market by discovering and fixing bugs as early as possible. That is a task which is far too important to rely only on manual testing.